
Cropping and Resizing a Picture in Power Point
Cropping a picture means making some of the illustration invisible. For example if you have used "Print Screen" and need only a small portion of the screen.
Resizing a picture is done when you want the entire image, but want it to be either smaller or larger. You can almost always make a picture smaller, but some pictures, when you try to make them larger lost clarity because the original resolution (number of pixels) was too small to handle the enlargement.
Cropping a picture
Power Point 2007 and 2010
Insert the picture on the slide
Select the picture
Click on Format under Picture Tools. (Note this choice is not visible unless the graphic is selected.) In Power Point 07 the Format Tool is on the left side.
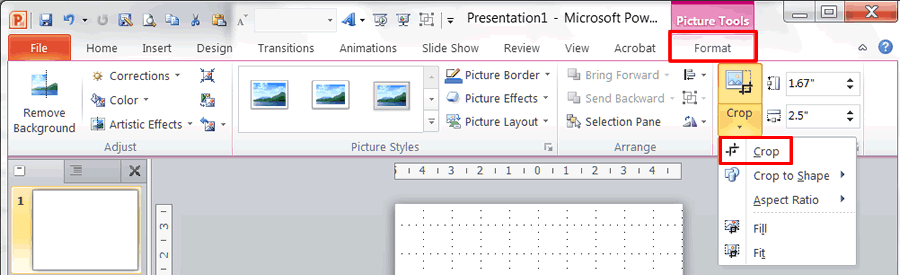
Click on the Crop tool. The picture will then be surrounded by the marks you see in the illustration to the right.
Placing your mouse pointer on any of the markers and drag to crop the picture.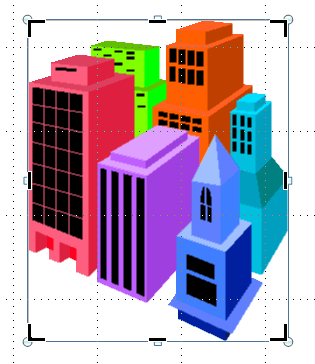
Click outside the picture to turn off cropping.
You can return the picture to its original shape by dragging out, or tapping Ctrl+Z (universal undo key) until it has its original shape. Keep in mind that cropping does not delete any of the picture, only makes part invisible. Thus it will not reduce the size of an image.
Note the option to "crop to shape," when you click on the crop tool. Select that and pick a shape and the picture will be cropped to that shape.

Power Point 2003
Select the graphic from which you wish to extract a smaller part. 
Make sure the drawing tool bar is visible. If not: On the menu line click on View>Toolbars Click on Drawing
Click on the crop tool (![]() )
The image is now surrounded by lines as seen at the right.
)
The image is now surrounded by lines as seen at the right.
Place the mouse pointer on one of the black lines. It will change to a "T".
Drag inward. If you go too far you can always drag back.
Place the mouse pointer on as many sides as needed to crop to the "picture" you need.
Continue until only what you want the audience to focus on is visible.
Click outside the graphic which changes the selection items to the usual dots. (Sometimes the crop bars change back to the regular selected dots because of an inadvertent click somewhere. If this happens just reclick the crop tool with the graphic selected.)
Enlarge as needed.
Note: The file size of the graphic remains what it was BEFORE the picture was cropped. Thus you can always "uncrop." If you are planning on using the slides on the Web it will be better if you use a tool that reduces the file size of the picture such as Paint that is part of the Accessories in Windows.
Resizing a picture
Select the picture.
Place the mouse pointer on a corner (If you use a side the picture will be distorted.) The shape will become a double arrow.
Drag to the appropriate size.
Note: When making a picture larger, it may become grainy if the resolution is not high enough to allow resizing.
If you are resizing the picture to make the file size smaller, use the Windows Accessory Paint.
Created November 15, 2011
© 1999- 2013 Linda Q. Thede & Jeanne P. Sewell