Creating Flexible Slide Presentations
Presentations don't always go as planned. An audience member asks a question that either needs more explanation than you planned for, or that you planned to explore a little later. Can you prepare for this? Yes!
There are several ways. If you are not sure of your audience's level of knowledge, you can prepare slides that can be shown if needed, or ignored depending on the audience. You can also change the order of your slides during the presentation just as if you were using old-fashioned overheads - but much more easily! Either presentation tool, however, requires planning!
First after you are through creating your slides identify topics where more information might be needed depending on your audience. Also identify your main topics. Then be sure that any slide that would introduce a topic or that might be needed to explore a topic further and be sure that it has a title.
For a slide to be identified with a name when printing it is necessary for the slide to have a title. Sometimes, however, you do not want a title on the slide itself. To overcome this create a title, but change it's color to match the background. If that is impossible because you can't match the background color, make the font as small as possible (size 8), drag the sides of the title box until it just holds the title and drag it off the slide. It will not show up in slide view, but will be in the outline and will be visible in the normal view, but off the slide.
Once you are done, you need to print out outline which will print the title and the number of the slide. During the presentation you can access any slide in the presentation by typing the number of the slide followed by the Enter key.
You can also hide certain slides (Use help to discover how), then if you want to show these slides, just enter the first number of the segment followed by the enter key. Just know the slide number to which you wish to return!
Print the Outline
Be sure you are in the normal view or the view that shows both the slides and the left column with tabs for both outline and slides visible. (In 2007 and 2010, if this is not the view, click View, and in the left hand part of the ribbon click Normal).
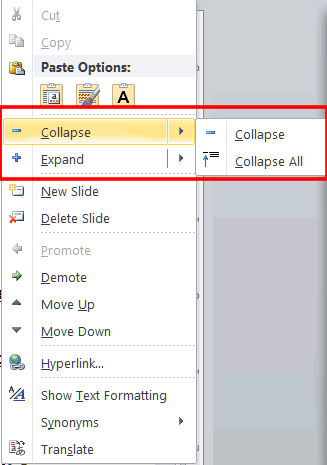
Decide whether you want just the title of the slide, or more information to be printed. To change so that either only the title or more information is in the outline, right click anywhere in the outline view. The menu at the right appears. In 2007 or 2010 you can collapse or expand either the slide on which you have your insertion point when you right click, or all the slides.
For 2003, you will need to select the entire outline (Ctrl+A) and then tap the right mouse button before selecting collapse.
Power Point 2010
Click the file tab and select print.
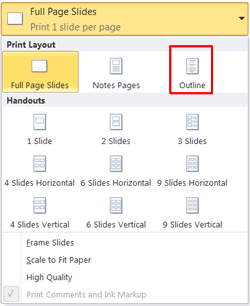
Under Settings, drop down the arrow by "Full Page Slides" and click on outline
Click the Print square at the top of the Print menu.
Power Point 2007 &2003
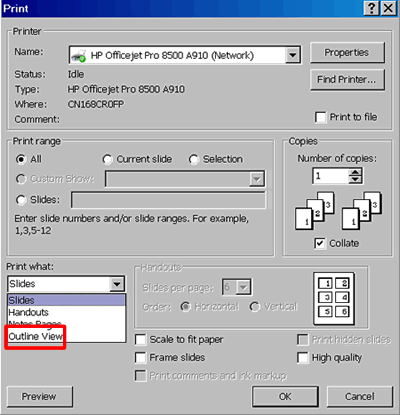
 In 2003, click on File>Print, in 2007 click on the Office Button in the upper left corner and select Print
Under "Print What" in the lower left corner of the window, click on the arrow to see the drop down menu and select "Outline."
Click OK.
Created November 16, 2011

