Creating Headers on Word Processed Pages
Headers are text and or page numbers that are automatically affixed to the beginning of every page in the document. A footer is automatically placed at the end of every page. To do this manually is to create a document that cannot be edited (Everyone needs to edit!) and will take more time than following these simple instructions! Headers can be created before you start to write the paper, after you finish, or at any time during the writing. However, if you are using Word, before creating the header, create the title page.
Word 2007 and 2010
Unfortunately, when Microsoft created Word 2007 they forgot that often folks want to place BOTH text and page numbers at the beginning of each page, such as when preparing a scholarly paper in the APA format. Hence instructions when you do not need both, and when you do.
Header with ONLY either a page number of text
Header with BOTH a page number and text
Header containing EITHER a page number or text, not both
Click the Insert tab on the ribbon
Select either header or footer or page number.
A list of possibilities for formatting drops down. Select the appropriate one and enter any needed information.
Header containing BOTH a page number and text
Place your insertion point above the top margin of the page where you wish this header to start, probably the title page and double click.

The document screen now has a place for the header while at the top of the screen you see the Header and Footer Tools Ribbon (See the green label below).

Unfortunately Microsoft assumes that you want the header centered, so you need to right justify. To do this tab the Tab key twice. (If you need to left justify the page header click here for instructions.)
In the "Insert" Group click on the arrow by "Quick Parts."
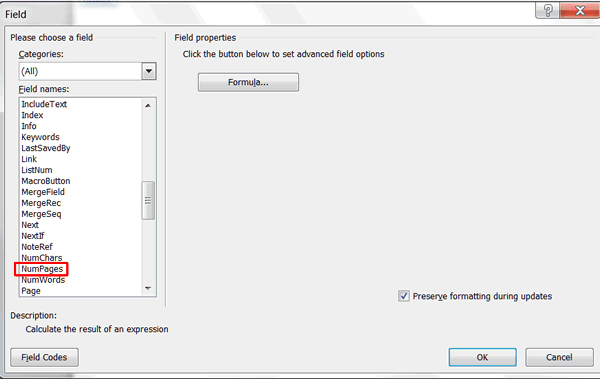
On this menu click on "Field.."
 The window to the left appears. Scroll down to “NumPages” and click on that.
Click "OK."
The number 1 will be placed in the right hand side of the top of the paper.
Click Close Header and Footer Tools in the ribbon "Header and Footer Tools."
Voila! It is done. Now you can edit this paper as much as needed without disturbing what appears at the top of every page.
To left justify the page header text
Click on the "Home" tab and when the Home Ribbon appears select the "left justification" icon ![]() from the Paragraph Group.
from the Paragraph Group.
Type in the manuscript page header exactly as you wish it to appear on every page. Limit to 40 characters.
To keep the text left centered while placing the page number on the right side of the page, tap the tab key twice which places the insertion point at the right while leaving the text left justified.
Now you need to get back to the header and footer tools. To do this, double click on the green "Header & Footer Tools" label that will still be visible. Then click here to follow the rest of the instructions.
Word 2003
- On the menu line click View>Header and Footer
- The default is to create a header. If you wish to create a footer instead, click on the icon in red in the figure.

- In the header box you can have text that is left justified, centered, and right justified all on the same line. When you open the header/footer option, your text is automatically left justified. Type the header exactly as you wish it to appear.
- The page number should go in the upper right corner. To right justify this, tap the Tab key twice.
- To enter a page number, click on the icon inside the red square in the figure. (Place your mouse over the other icons to see what they do.)
- Click Close.
Word Perfect
Click on the Insert Menu>Header Footer..
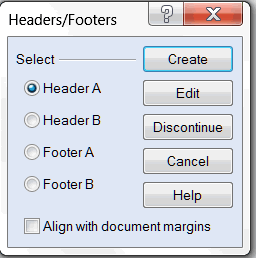
The menu you see at the right appears with Header A as the default.
Click Create.
Type the running head exactly as you wish it to appear on each page.
![]() Tap Alt+F7 and click on the page numbering icon you see in the menu at the left, then click on "Page Number" from that menu. (If you leave your insertion point on any of these icons a tip will appear describing what they do.)
Tap Alt+F7 and click on the page numbering icon you see in the menu at the left, then click on "Page Number" from that menu. (If you leave your insertion point on any of these icons a tip will appear describing what they do.)
Click below the line separating the header from the document and start typing...
Created November 10, 2011


