
Changing Attributes in a Word Processor
One of the wonderful features in word processing is the ability to change how the text looks and how the lines are spaced.
The instructions here guide to you changing the font type and size of the text and line spacing. As you will see when you open the window to change the font type and size there are many attributes that you can add to the text. Take the time to look at the offerings in that window.
- Changing Font Size or Type in Word 2007 or 2010
- Changing Font Size or Type in Word 2003
- Changing Font Size or type in Word Perfect
Word 2007 and 2010
On the Home Tab in the Font grouping, click on the arrow next to the current font. 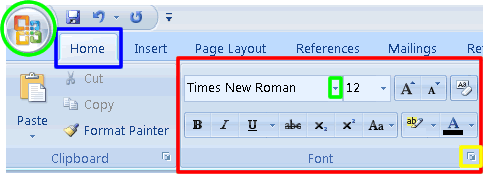 Select the font from the choices. If you only wish to change the font for a given section of text, select the text before you change the font.
Change default font
Click on the little arrow in the yellow square in the illustration above.
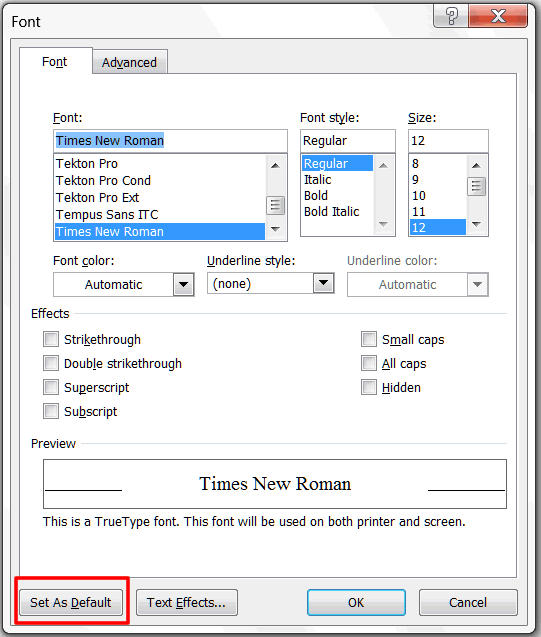 Select the appropriate font and size (Times New Roman with size 12 is the font usually required for printed documents) and click on "Set as Default" and click "OK."

Word 2003
Select the text in the part of the document for which you wish to change either the font size of type.
On the Menu line, click on Format>Font.
From the pop-up window for the font drop down the box and select the font you wish. Do the same for the size. Note that Times New Roman with font size 12 is the desired font for most papers.
If you wish this to be the default font, click on Default in the lower left corner of the window.
Click OK when through making selections.
Word Perfect
Select the text for which you wish to change the font. If it's the entire document, just place your insertion point at the very beginning of the document.
If the font tool bar (it's the property tool bar) is not visible, on the Menu line click on Format Font. Make your selection from this list and click "OK."
Created November 13, 2011
© 1999- 2013 Linda Q. Thede & Jeanne P. Sewell