Showing Bullet Points One at a Time
Too many presenters place a slide with 4 to 8 bullet points in front of an audience and then start to talk about the first one. The audience of course is reading all of the bullet points or scribbling them down instead of listening. Often a better approach is to show the bullet points one by one as you discuss them. Power Point refers to this as custom animation, but a better term is "progressive disclosure."
This technique is very helpful to focus attention when you plan to talk about each point on a slide individually. Whether to use it or not depends on how you will use a slide. If you are just briefly mentioning each point then having all the points present on the screen together is the best course. If, however, you will discuss each point separately, then use custom animation.
When using this technique be sure that you are making visible a point just as you start to discuss it. It is important that the verbal match the visual.
Although this custom animation technique can be applied to any object on a Power Point slide such as a graphic, the directions will be given here for bulleted text. Variations in use of this feature allow you to make objects appear and disappear and follow a path that you create. As you become more comfortable you will want to experiment with many of the options.
Create progressive disclosure in:
Power Point 2010
- Select the first bullet point that you wish to have appear. You may want the first bullet point on the screen when you start this slide, in which case you would select the second point.
- From the Home Ribbon click on Animations (red square).
- Click on Add Animation (yellow square).

- Make your selection for which effect you wish and double click on it. "Appear" (in orange) is usually the easiest on the audience unless the message on the slide needs another effect to make its message.
- Click the Animation Pane (green box) for more effects. Select the item for which you wish to add timing or other effect and drop down the arrow at the right end of the item.
- To change the order of appearance, use the reorder animation (blue box) pane.
Power Point 2007
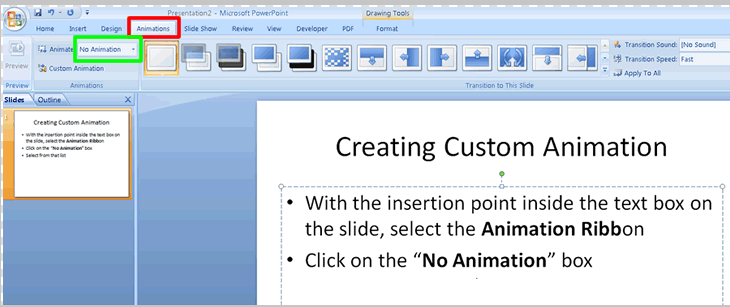
This list appears. Notice that the choices are for all the points to appear together, or each first level paragraph to appear with the selected attribute, 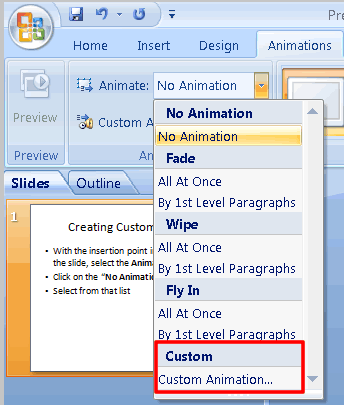 that is the first level paragraph.
Make your choice from this list. When you select "By 1st Level Paragraphs," each first level point and its subpoints will appear together during the presentation.
If you want subpoints to appear independently of the first level,or you wish to change effects from the default, click on Custom Animation on 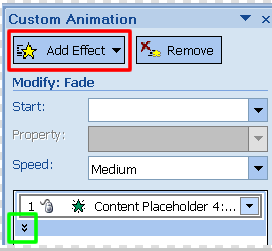 the bottom of the list.
On the right side of the screen you will see the box on the right. To change the effect for all the points, click on "Add Effect" (red box)
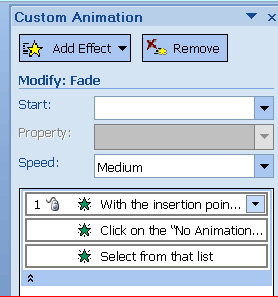 To make changes individually, or have the subpoints appear separately from the first level, click on the two down arrows on the bottom left of the box you see above.
This box now shows all the points on the slide. If there are subpoints they will appear as a separate item.
Click on any of the bulleted points in that box, click on the arrow next to start and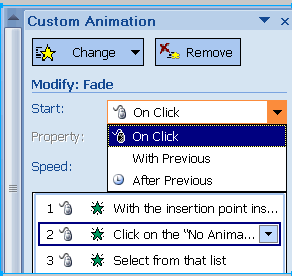 make a choice. If you want new points to appear independently, but after a given time period, once you select "With Previous" click on the Speed box and select after a bullet that appears with a click,
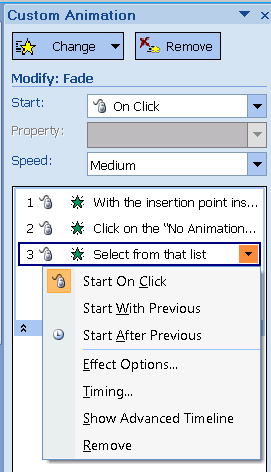 To add other effects, click on the down arrow next to the point you wish to change and make selections from the list.
Notice on the bottom of the custom animation box, the up and down arrows that you see to the right. To change the order, with a bullet point selected, click on either the up or down to change the order in which the points appear.
The play button, when clicked, will show automatically how the slide will play during a presentation. The slide show button will switch to slide presentation mode and you will need to use the enter key or mouse click to make each new point appear.
These affects can be applied to any graphics, and they can be interspersed with your bullet points. With some more experimentation you will find many more ways to illustrate your talk. Just be sure that the effect you use actually demonstrates a point, and is not used gratuitously.
Power Point 2003
- Select Custom Animation which produces a column on the right side of the screen.
- Click on Add Effect
- From the drop down box click on Entrance.
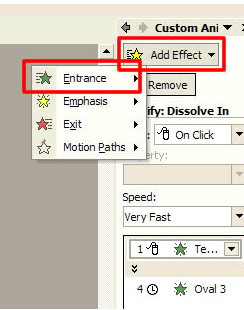
- Select the effect you wish. (It is recommended that one use these judiciously, what is "cute" to the designer, may detract from the overall presentation. Appear or dissolve are the least intrusive.)
- Numbers will appear along the left side of the text box indicating the order in which each point will appear.
- Note the other choices, e.g. under "Start" where you can select if the next object should appear when you click, or automatically show right away or after a given time.
- To remove an effect, click on the number on the slide and in the right column click Remove.
- There are times when sub points under a bullet point should come in individually.
- The default is for the subpoints to appear with the main point. This can be changed.
- To do this:
- On the right side bar click on the gray line under the point to which you wish to have sub-points appear individually. It has two carets (^) pointing upwards.
- Click on the point you wish to appear separately to select it. In the start box click "on click."
- On the right side bar click on the gray line under the point to which you wish to have sub-points appear individually. It has two carets (^) pointing upwards.
Repeat steps a and b for any points you wish to affect.
The XP (2002) version added many new features to custom animation including the ability to move an object across the screen in a path that you design, and the ability to make items disappear. Used creatively these can produce many interesting effects. NEVER use them unless they illustrate a point - else they will upstage you.
Power Point 97 & 2002
- Right click anywhere in the bulleted text box
- Select Custom Animation
- Drop down the box under Entry Animation and Sound
- Click on the technique you wish to use (It is recommended that you use these judiciously, what is "cute" to the designer, may detract from the overall presentation. Appear or dissolve are the least intrusive.)
- If you have more than one level of bullets, after selecting the technique, under "grouped by," select the appropriate level.
- Click on Preview to see how the objects will appear when you show the slide.
Additional Hints
HINT: Sometimes when you use custom animation in a presentation you may not remember if a point is the last one on your slide. You may want to add a small circle in the lower right corner of the slide that appears automatically with the last point. Thus a glance at the slide tells you "This is all there is."
To add this, wait until the presentation is in a final format (Or as final as it can be at this point - one changes things even at the last minute.), then using the drawing too create it on the first slide and add the custom animation that it appear with the last point. Then copy and and paste it on every slide that is using progressive disclosure. This assures that the placement is the same on all slides and that it will appear with the last point.
WARNING: Be careful in applying features that you will find as you implement progressive disclosure. It is possible for the slide to upstage you and prevent the audience from hearing your message. When you use these features be sure that they add understanding to the message, not glitz.
Created November 17, 2011

